
本教程将向您展示如何使用Let’s Encrypt证书颁发机构免费颁发的TLS证书在Debian 9上安装和保护Nginx web服务器。此外,我们将在证书过期之前使用cron作业配置Lets’Encrypt TLS证书的自动续订。
TLS,也称为传输层安全,是一种网络协议,它使用SSL证书对服务器和客户端之间,或Nginx服务器等web服务器和浏览器之间的网络流量进行加密。这两个实体之间交换的所有数据都是安全的,即使使用中间人攻击或数据包嗅探等技术拦截连接,也无法解密连接。certbot软件包是Let’s Encrypt CA提供的官方客户端实用程序,可用于在Debian中生成和下载免费的Let‘s Encrypt证书。
必要条件
在Debian 9中安装LEMP堆栈。
具有正确DNS记录的公共注册域名(子域的A记录或CNAME记录)。
直接访问服务器的控制台或远程SSH访问服务器。
具有root权限或直接访问root帐户的用户帐户。
安装Certbot客户端实用程序
为了从Debian官方存储库在Debian 9中安装Let’s Encrypt cerbot客户端实用程序,请打开一个终端并以root权限发出以下命令,如下图所示。
apt-get install certbot![图片[1]_在Debian 9中安装使用SSL/TLS加密和保护Nginx_马特资源网](http://www.pc-maint.com/wp-content/uploads/2025/05/af42a98f85101407.png)
Debian apt实用程序是Debian主软件包管理器的命令行界面,在经过一些初步检查后,它会询问您是否同意继续安装certbot软件包及其所有必需的依赖项。要接受安装软件的过程,请在服务器的控制台提示中回答yes(y)。
获取Let’s Encrypt证书
要为域生成和下载Let’s Encrypt证书,首先确保Nginx web服务器已启动并运行,并且至少可以从互联网访问端口80。要验证Nginx是否正在运行,请使用root权限执行以下命令。
sudo systemctl status nginx如果服务器尚未运行,请使用以下命令启动Nginx守护进程。
sudo systemctl start nginx如果您在Debian中安装了通用防火墙,例如UFW防火墙,它阻止了端口80和443上的所有传入连接,请发出以下命令打开系统中的HTTP和HTTPS端口。
sudo ufw allow 80/tcpsudo ufw allow 443/tcp为了获得您的域的证书,请在控制台中使用以下参数和标志执行cerbot命令,如下所述。以root权限运行该命令,并使用-d标志提供您的域名和所有其他要获取证书的子域。此外,请提供–standalone选项,以便certbot不会干扰Nginx配置文件。使用此选项颁发证书时,必须停止Nginx服务器。
cerbot命令语法:
sudo certbot certonly --standalone –d yourdomain.com –d www.yourdomain.com当您首次运行certbot命令并获取证书时,系统将提示您添加电子邮件地址并同意Let’s Encrypt服务条款。写“a”表示同意服务条款,写“否”表示不与Let’s Encrypt合作伙伴共享您的电子邮件地址。最后,在您获得域的证书后,阅读页脚注释以查找证书系统路径和到期日期。
获取Let’s encrypt SSL证书的替代方法
要通过“webroot”插件获取Let’s Encrypt证书,请使用以下语法。添加Nginx web根目录,默认情况下位于/var/www/html/system路径中,同时发出带有–webroot和-w标志的certbot命令。此外,请确保Nginx具有对web根目录的完全写入权限,以便创建/.wearned目录。
cerbot的–webrot选项还将要求您添加证书续订和安全通知的电子邮件地址。Certbot客户端具有内置代码,可以检测虚假电子邮件地址。您必须提供一个公共可访问的电子邮件地址才能继续获得证书。
certbot certonly --webroot –w /var/www/html/ -d yourdomain.com –d www.yourdomain.comSaving debug log to /var/log/letsencrypt/letsencrypt.log
Enter email address (used for urgent renewal and security notices) (Enter 'c' to
cancel):[email protected] #A fake email address will be detected
There seem to be problems with that address. Enter email address (used for
urgent renewal and security notices) If you really want to skip this, you can
run the client with --register-unsafely-without-email but make sure you then
backup your account key from /etc/letsencrypt/accounts (Enter 'c' to cancel):[email protected]
-------------------------------------------------------------------------------
Please read the Terms of Service at
https://letsencrypt.org/documents/LE-SA-v1.1.1-August-1-2016.pdf. You must agree
in order to register with the ACME server at
https://acme-v01.api.letsencrypt.org/directory
-------------------------------------------------------------------------------
(A)gree/(C)ancel: a
-------------------------------------------------------------------------------
Would you be willing to share your email address with the Electronic Frontier
Foundation, a founding partner of the Let's Encrypt project and the non-profit
organization that develops Certbot? We'd like to send you email about EFF and
our work to encrypt the web, protect its users and defend digital rights.
-------------------------------------------------------------------------------
(Y)es/(N)o: n
Obtaining a new certificate
Performing the following challenges:
http-01 challenge for www.domain.com
Using the webroot path /var/www/html/ for all unmatched domains.
Waiting for verification...
Cleaning up challenges
IMPORTANT NOTES:
- Congratulations! Your certificate and chain have been saved at
/etc/letsencrypt/live/www.yourdomain.com/fullchain.pem. Your
cert will expire on 2017-12-28. To obtain a new or tweaked version
of this certificate in the future, simply run certbot again. To
non-interactively renew *all* of your certificates, run "certbot
renew"
- Your account credentials have been saved in your Certbot
configuration directory at /etc/letsencrypt. You should
make a secure backup of this folder now. This configuration
directory will also contain certificates and private keys obtained
by Certbot so making regular backups of this folder is ideal.
- If you like Certbot, please consider supporting our work by:
Donating to ISRG / Let's Encrypt: https://letsencrypt.org/donate
Donating to EFF: https://eff.org/donate-le![图片[2]_在Debian 9中安装使用SSL/TLS加密和保护Nginx_马特资源网](http://www.pc-maint.com/wp-content/uploads/2025/05/13114d992c101650.png)
为TLS(SSL)配置Nginx
域的Nginx完整默认TLS配置文件应如下面的文件摘录所示。
/etc/nnginx/sites-enabled/default-ssl文件示例:
    server {
                    listen 443 ssl default_server;
                    listen [::]:443 ssl default_server;

                server_name  www.yourdomain.com yourdomain.com;
                #server_name _;

                root /var/www/html;

                access_log /var/log/nginx/access.log;
                error_log /var/log/nginx/error.log;

               #SSL Certificates
                ssl_certificate "/etc/letsencrypt/live/www.yourdomain.com/cert.pem";
                ssl_certificate_key "/etc/letsencrypt/live/www. yourdomain.com/privkey.pem";
                ssl_dhparam /etc/nginx/dhparam.pem;

                ssl_protocols TLSv1 TLSv1.1 TLSv1.2;
                #ssl_ciphers EECDH+CHACHA20:EECDH+AES128:RSA+AES128:EECDH+AES256:RSA+AES256:EECDH+3DES:RSA+3DES:!MD5;

                ssl_session_cache shared:SSL:1m;
               ssl_session_timeout 10m;
                ssl_ciphers HIGH:!aNULL:!MD5;
                ssl_prefer_server_ciphers  on;

                add_header Strict-Transport-Security "max-age=31536000;
                #includeSubDomains" always;

                location / {
                    index index.php index.html index.htm;
                    try_files $uri $uri/ /index.php?$args $uri/ =404;
                }


                set $cache_uri $request_uri;

                location ~ /.well-known {
                allow all;
                                }

                #
                #             # With php-fpm (or other unix sockets):
                                fastcgi_pass unix:/var/run/php/php7.0-fpm.sock;
                #             # With php-cgi (or other tcp sockets):
                #             fastcgi_pass 127.0.0.1:9000;
                }

               # deny access to .htaccess files, if Apache's document root
                # concurs with nginx's one
                #
                #location ~ /\.ht {
                #             deny all;
                #}

    }
通过FastCGI Process Manager处理PHP脚本的代码行也可以在本摘录中找到,并由以下行表示。
location ~ \.php$ {
                                include snippets/fastcgi-php.conf;
fastcgi_pass unix:/var/run/php/php7.0-fpm.sock;
                }
在Nginx中安装Let’s Encrypt证书
Let’s Encrypt证书和密钥存储在Debian的/etc/letsencrypt/live/www.yourdomain.com/目录中。对上述目录执行ls命令将显示所有证书组件,如链文件、全链文件、私钥和证书文件。
ls /etc/letsencrypt/live/www.yourdomain.com/要在Nginx web服务器TLS配置文件中安装Let’s Encrypt证书,请打开Nginx默认ssl文件并更新以下行,以反映您域的Let’s Encrypt证书文件路径,如以下摘录所示。
nano /etc/nginx/sites-enabled/default-ssl将以下行更改如下:
                ssl_certificate "/etc/letsencrypt/live/www.yourdomain.com/cert.pem ";
ssl_certificate_key "/etc/letsencrypt/live/www.yourdomain.com /privkey.pem";![图片[3]_在Debian 9中安装使用SSL/TLS加密和保护Nginx_马特资源网](http://www.pc-maint.com/wp-content/uploads/2025/05/e5c0f5b15c101839.png)
此外,如果ssl_dhparam语句存在于Nginx ssl配置中,则必须通过发出以下命令生成新的2048位Diffie–Hellman密钥。Diffie-Hellman密钥参数的生成需要一段时间,具体取决于系统的随机性或熵。
openssl dhparam –out /etc/nginx/dhparam.pem 2048最后,在通过重新启动Nginx守护进程来激活Nginx TLS配置以反映更改之前,请先检查Nginx配置是否存在潜在的语法错误。之后,如果Nginx配置文件测试成功,请通过发出以下命令重新启动Nginx守护进程,以加载新的配置以及Let’s Encrypt证书。
nginx -t
service nginx restart![图片[4]_在Debian 9中安装使用SSL/TLS加密和保护Nginx_马特资源网](http://www.pc-maint.com/wp-content/uploads/2025/05/c0cf9ca62a101929.png)
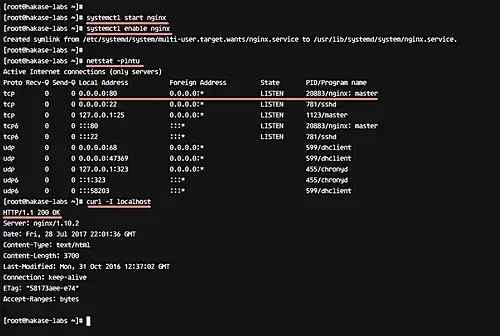
为了验证nginx服务是否在端口443上拥有一个处于监听状态的打开套接字,请执行netstat命令,如下摘录所示。
netstat –tulpn | grep -e 443 -e LISTEN您还应该打开浏览器,通过HTTPS协议导航到您的域名。如果Let’s Encrypt证书在Nginx中成功应用,SSL握手应该能顺利进行,不会出现任何错误。
https://www.yourdomain.com
强制网络流量使用HTTPS
要强制您的域访问者仅通过HTTPS协议浏览您的网站,请打开启用Nginx站点的默认配置文件,并添加以下行,该行将强制所有访问端口80的请求以301状态代码(永久移动)重定向到端口443。
nano /etc/nginx/sites-enabled/default重定向语句应如以下摘录所示。
server_name www.yourdomain.com yourdomain.com;
return 301 https://$server_name$request_uri;![图片[5]_在Debian 9中安装使用SSL/TLS加密和保护Nginx_马特资源网](http://www.pc-maint.com/wp-content/uploads/2025/05/1c2ac8a9be102059.png)
随后,通过发出以下命令重新启动Nginx守护进程以应用更改。
service nginx restart最终检查
要进一步调查Let’s Encrypt CA生成的证书,您可以使用现代网络浏览器,如Chrome。从Chrome浏览器访问您的域,然后按F12功能键打开开发人员工具。导航到“安全”选项卡,点击“查看证书”按钮以打开证书,如下图所示。
![图片[6]_在Debian 9中安装使用SSL/TLS加密和保护Nginx_马特资源网](http://www.pc-maint.com/wp-content/uploads/2025/05/04077ca01a102134.png)
![图片[7]_在Debian 9中安装使用SSL/TLS加密和保护Nginx_马特资源网](http://www.pc-maint.com/wp-content/uploads/2025/05/22769f9d34102142.png)
调查SSL证书的另一个有用的实用程序是openssl命令行实用程序。为了显示Let’s Encrypt CA证书的额外信息,请在Linux控制台中执行以下命令。
openssl s_client –connect www.yourdomain.com:443![图片[8]_在Debian 9中安装使用SSL/TLS加密和保护Nginx_马特资源网](http://www.pc-maint.com/wp-content/uploads/2025/05/c37d629f1b102206.png)
自动续订Let’s Encrypt证书
为了在到期日期之前自动续订Let’s Encrypt CA颁发的证书,请通过发出以下命令,安排crontab作业每天凌晨2:00运行一次。执行的cron作业的输出将被定向到日志文件,存储在/var/log/letsencrypt.log中
crontab –eCron作业用于续订证书。
0 2 * * * certbot renew >> /var/log/letsencrypt.log就这些!有关Let’s Encrypt证书和实用程序的其他更高级配置,请访问以下互联网地址的官方文档https://certbot.eff.org/docs/.


暂无评论内容